Definitions
KVM
KVM is an acronym for Kernel-based Virtual Machine, it is a technology solution for virtualization based on the Linux kernel module. The KVM technology will turn the Linux machine into hypervisor virtualization, which is called the host machine. On the host machine, you will be able to create multiple isolated systems called virtual machines (VM).
QEMU
QEMU or Quick Emulator is an open-source system emulator and virtualizer for hardware virtualization. Generally, it is used as a virtualizer with the KVM kernel module to run virtual machines.
Checking System Architecture & CPU Virtualization Support
- Execute the following command to check the system architecture of your system.
uname -a- Your output will look like this, and pay attention to the “x86_64” or “64-bit” architecture
Linux MiPro-Manjaro 5.15.78-1-MANJARO #1 SMP PREEMPT Thu Nov 10 20:50:09 UTC 2022 x86_64 GNU/Linux- Check the hardware virtualization support by running the following command.
sudo lscpu | grep Virtualization- Search for Kernel Module
zgrep CONFIG_KVM /proc/config.gzExample output:
CONFIG_KVM_GUEST=y
CONFIG_KVM_MMIO=y
CONFIG_KVM_ASYNC_PF=y
CONFIG_KVM_VFIO=y
CONFIG_KVM_GENERIC_DIRTYLOG_READ_PROTECT=y
CONFIG_KVM_COMPAT=y
CONFIG_KVM_XFER_TO_GUEST_WORK=y
CONFIG_KVM=m
CONFIG_KVM_INTEL=m
CONFIG_KVM_AMD=m
CONFIG_KVM_AMD_SEV=y
CONFIG_KVM_XEN=y
CONFIG_KVM_MMU_AUDIT=y
If you are using an AMD processor, you should see CONFIG_KVM_AMD (or CONFIG_KVM_INTEL if you are using intel) followed by =y or =m, then you are good to go.
- You can also check how much memory and free disk space you have
free -h
df -h
Installation
- Check and update your system
sudo pacman -Syy- Installing Arch Linux keyring
sudo pacman -S archlinux-keyring- QEMU and dependencies Installation
sudo pacman -S qemu-desktop qemu-arch-extra ovmf bridge-utils dnsmasq vde2 openbsd-netcat ebtables iptables libvirtBelow are essential packages you must know:
- qemu: An open-source machine emulator and virtualizer.
- ovmf: helps to do the UEFI Bios and Secure Boot setups.
- bridge-utils: Utilities for configuring Linux network bridge needed for VMs.
- vde2: for QEMU distributed ethernet emulation
- dnsmasq: Lightweight DNS forwarder and DHCP server.
- virt-manager: A GUI application for managing virtual machines.
- openbsd-netcat network testing tool (Optional)
- ebtables and iptables to create packet routing and firewalls
- libvirt: An API for controlling virtualization engines such as KVM, QEMU, etc.
- Install Virt-Manager and libvirtd Service
sudo pacman -S virt-manager virt-viewer- Virt-manager is a UI that helps to create and organize the VM’s.
- And virt-viewer is used to open a remote window into the VM instance.
- Install libguestfs
sudo pacman -S libguestfslibguestfs is a set of tools used to access and modify virtual machine (VM) disk images. You can use this for:
- viewing and editing files inside guests
- scripting changes to VMs
- monitoring disk used/free statistics
- creating guests
- P2V
- V2V
- performing backup e.t.c
- Enable and Start for at boot KVM libvirt service
sudo systemctl enable libvirtd.service
sudo systemctl start libvirtd.service- Add user to libvirt group to use the system-level virtual machines (qemu:///system)
sudo usermod -a -G libvirt $USERConfigure the KVM
Open the /etc/libvirt/libvirtd.conf for editing
sudo nano -cl /etc/libvirt/libvirtd.confHere are the Lines to Edit:
- Uncomment the line 85 or so:
unix_sock_group = "libvirt"- Uncomment the line 108 or so:
unix_sock_rw_perms = "0770" Make sure to save the file before you exit.
Verify QEMU/KVM Installation with virt-manager
Now open the application “virt-manager” from your application menu.
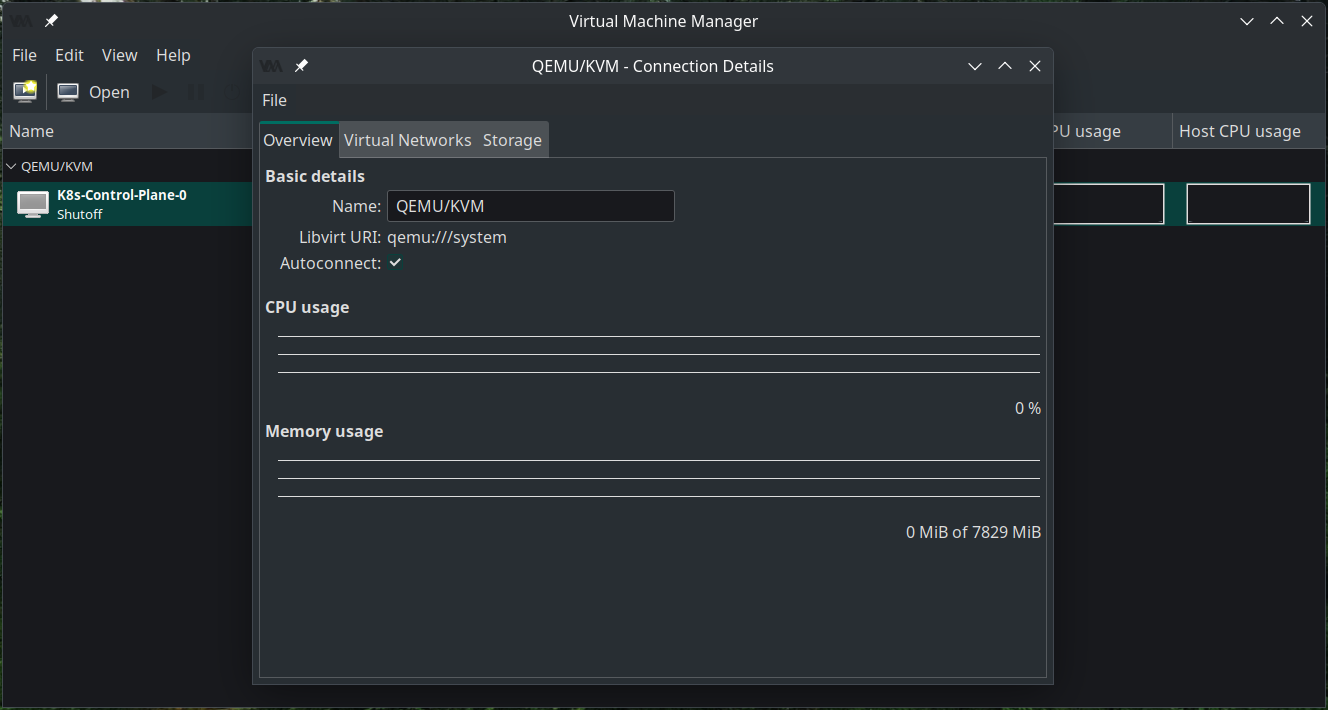
- Click the menu “Edit -> Connection Details” on the virt-manager application.
- On the tab “Overview” you will see the virt-manager will automatically connect to “qemu:///system”.
- Move to the tabs “Virtual Networks” and you will see the “default” network configuration.
- Interface: virbr0
- Auto start at boot: yes
- IP address: 192.168.122.0/24
- Range DHCP IP address: 192.168.122.2 - 192.168.122.254
- Type network: NAT- Now, move to the tab “Storage”, and you will see the “default” pool storage configuration.
- Type: Filesystem directory
- Size: Depends on your disk
- Location: /var/lib/libvirt/images
- Auto start at boot: yes
All virtual machine images will be available on this default storage, the directory /var/lib/libvirt/images.
Create new pool storage for ISO image files
Next, click the button “+” to create new pool storage for ISO image files. All ISO files and operating systems will be available at this pool.
Follow storage configuration as below:
Name: ISO
Type: dir: Filesystem Directory
Target Path: /path/directory/to/your/iso/
Click the “Finish” button to complete the process. After that, you are ready to create new virtual machines.
Creating a New Network Bridge for VM
A new network bridge is needed to allow a separate IP subnet for Guest OS’s in VM.
- Create a new file like bridged-network.xml:
nano -cl /tmp/bridged-network.xml- Add the following detals in the file
<network>
    <name>bridged-network</name>
    <forward mode="bridge" />
    <bridge name="br0" />
</network>- Register for the Bridge Network
Once the file is ready we pass its position as an argument to the net-define virsh subcommand:
sudo virsh net-define /tmp/bridged-network.xmlNow we have the network registered in the libvirtd.
- To activate the new network and make it is auto-started, we should run:
sudo virsh net-start bridged-network
sudo virsh net-autostart bridged-network
Note: Permanently enabling this network would take resources. Hence the start command must be given every time before starting virt-manager.
sudo virsh net-start br0We can verify the network has been activated by running the virsh net-list command:
sudo virsh net-listOutput
 Name              State    Autostart   Persistent
----------------------------------------------------
 bridged-network   active   yes         yes
 default           active   yes         yes
Testing
Create a virtual machine
